Set design: start to finish
Set Design is very similar to how an architect works when he designs a building: discussions with the client about the intent, preliminary concepts, final design, and construction documents. Plus, of course, the budget and schedule.
The Project: The show titled An Inspector Calls, by J.B. Priestley.
Setting: England in 1911, during the Edwardian period, and concerns a suicide by a young female factory worker and the subsequent investigation. However, the story is really about how the upper classes of the period tended to isolate themselves from any social responsibility.
Step 1: Pre-design
First step in the process of pre-design is reading the play and doing some preliminary research on the Edwardian period: the history, the general mentality, the class structure, and the architecture. HINT: maybe watch an available movie version to gain more info – this movie was made in 1954 and starring Alastair Sim – it went beyond the story in the play itself.
Second step in the pre-design process is to meet with the director. This meeting is used to discuss the story, the characters, the themes, and the period, and what they want to say with the play. It can take some time, and stuff like doors or entrances or platforms or any technical stuff may not even come up. Instead themes, atmosphere, characters and the purpose may be talked about. To design this particular play the designer is looking for a better understanding of who the characters are and what kind of house they would have.
Third step in the pre-design process is to go over the script again, this time to get a sense of what was going on physically: who came in, who left, what they were doing, and so forth. The entire story takes place in the dining room, after a formal dinner to celebrate the daughter’s engagement to a (rich, of course) young man. The designer must have a sense of the traffic patterns, and any themes in the play the director mentioned or ones that keep coming up over and over.
Step 2: Conceptual Design
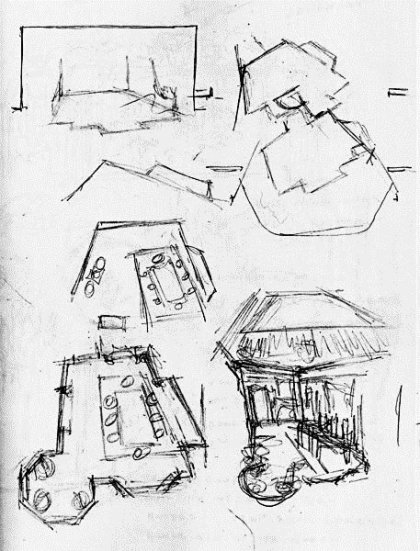
Now with a sketchbook (or loose paper) and a pencil, spend some time trying to visualize the themes. The designer has the whole stage to work with, so play with all options of positioning the set.
Below are a few initial sketches, from an 8-1/2” x 11” sketchbook. At this point the designs focus on the shapes that will help develop the themes in the story – the architecture, the traffic, the characters, and the fact that theater doesn’t have to be literal. Remain loose at this point and don't use anything other than a pencil. Remain comfortable and relaxed while you do the initial brainstorming.
After a fair number of these sketches, put down the notebook and do something else, leaving those shapes to rattle around inside your head. Later, come back and look at them again, realize what works, and decide on which direction to go.
If you have a CAD drawing (or scale blueprint) of the stage, draw it on the stage. Focus on the size and placement and angle of the set, and not on the details. It can take several attempts and some hours of tweaking and adjusting the proportions and the angles, and the placement, before it works just right. In this "positioning" phase of the design new ideas may also emerge for the design.
If you have access to 3D modeling computer programs or phone apps (like Google SketchUp) - import the drawing piece by piece it into the program and create a digital version of the “white model.” (you can also construct a white model out of foam core.) This model should have as much represented on the set as possible.
This was what you will show the director at the next meeting, The designer must be able to "walk" the director around the set. I find directors and choreographers love being able to see the set from different directions while it’s still a work in progress.
Step 3: The Final Design
Once the Director approves the work, it is time to develop the white model into a finished model for rehearsals. The designer has to do more research to find architectural details, interior décor, and appropriate furniture. Return to the blank paper and begin to thumbnail the details into the structure that has been designed.
These drawings can be converted to color and a color model can be built or details can be added to the existing white model. (SketchUp can also be used)
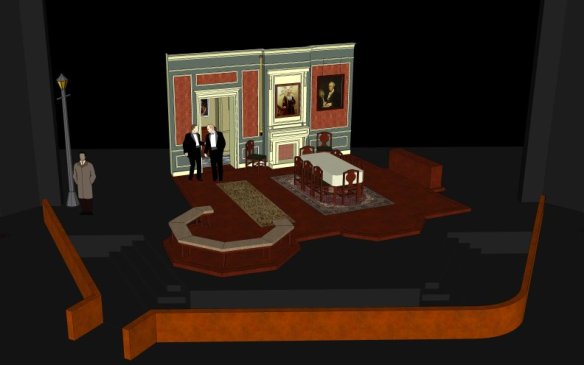
Third meeting with the director is to show the details of the floors, walls, the colors, all of the furniture, and any artwork. (not to excruciating, photo-realistic detail). NOTE: the model is just a means to an end, and not the end in itself. It’s very easy to get so carried away with the model or the rendering. The designer just needs a final full color rendering like the one shown below.
First Rehearsal the cast should be able to “feel” the space and walk around it. The physical scale model or a 3D drawing in Skectup needs to be shown to the cast with the director and designer present and allowing time to answer any question the cast may have at this point. It will help make necessary changes due to unforeseen issues with the design or layout.
Step 4: Shop Drawings
The designer must now prepare for the set to actually be built for the stage and this can happen on stage or in a shop (and loaded in)
A designer can do the drawings manually with a ruler and a pencil on large paper, or they can use a program called CAD (like below). The shop drawings must include finalized floor plans, elevations, sections, and details. All measurements should be drawn to scale with a legion in the bottom right corner for reference.
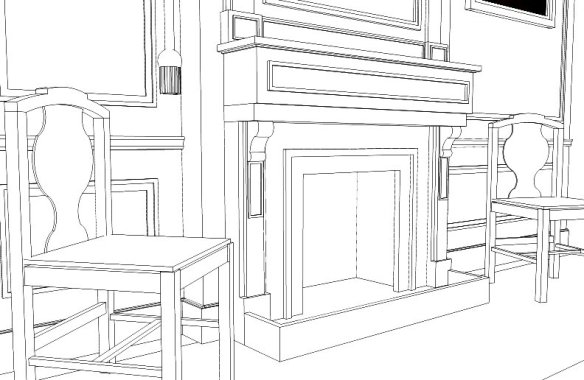
One of these, the drawing for the fireplace, is shown below; I did all these in 11×17 format, just for convenience, instead of the more common 24×36 size.
Here is an architectural detail for the shop crew so they would be able to visualize the design better. You can also provide color versions of these for the scenic artists to work from when they come in to paint the design.
 There’s nothing sacred about the steps and the sequence, but most designers follow this general format. It’s also the format used by architects and lots of other designers, and it works well. The general mantra: "start with the forest and then get into the trees and the branches and the leaves". Ultimately it starts by reading the play and listening to what the playwright is asking of you.
________________________________________________________________
This was edited and adapted from a set designer's blog page. This content is being used solely for education purposes and was edited to work in the high school technical theater classroom as a part of a lecture.
View the original blog content at:


Thanks for sharing the nice information, you want to know more about CAD Design Services, Facade Shop drawings, BIM Design Get In Touch With us. Facade Shop Drawing
ReplyDelete